Apple Crumble Danish

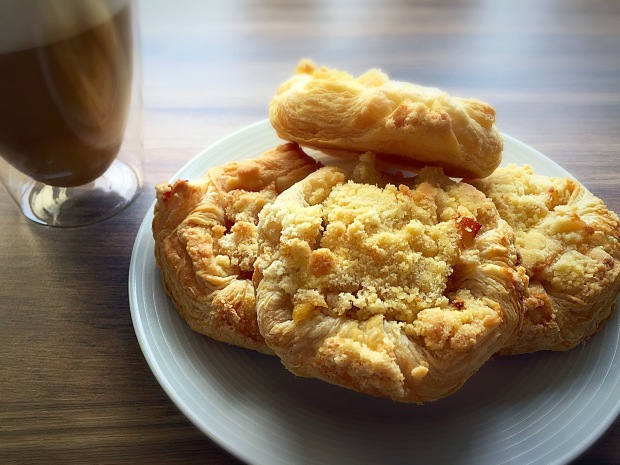
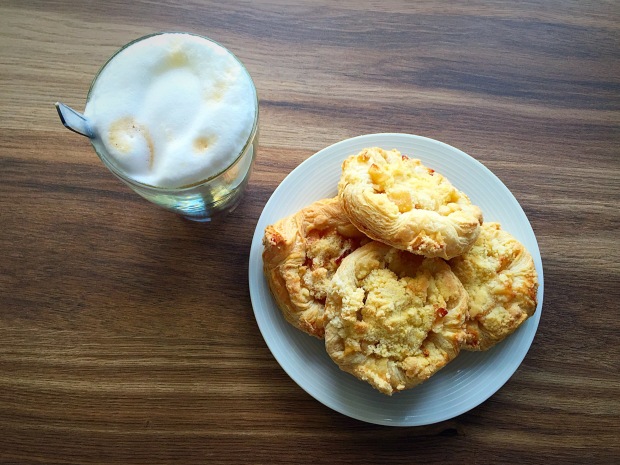
Experimenting with different desserts is definitely one of my favourite things, which is how I stumbled upon these delicious Apple Crumble Danishes. I love a Danish – pop on a some apple slices, a few raspberries, even the added blueberry for a little added purple “pazaz”, then serve it with a cup of coffee and I’d be as Happy as Larry all day long! I also love a Crumble! I love how no matter what fruit you use, that sweet crumbly goodness just seems to work so perfectly with it. There is literally nothing that doesn’t sit well with a Crumble. So what happens when you mix your two favourites together .. Tah Dah!

img_1465

Ingredients:

  • 2 tbsp butter
  • 3 tbsp demerara sugar
  • 5-6 small eating apples, peeled, cored and diced
  • pinch of ground cinnamon
  • 500g pack puff pastry, or you can make your own here
  • little plain flour for rolling
  • 1 egg, beaten

For the Crumble Topping:

  • 100g flour
  • 50g butter
  • 50g demarara sugar

Method:

  1. For the Filling, melt the butter and sugar in a medium saucepan. Stir in the apples and spices and leave to simmer for 10-15 minutes, until the fruit is slightly softened but not cooked. Remove from the heat and leave to cool.
  2. Roll the pastry out on a lightly floured surface to a £1 coin thickness. Cut out 8 x 11cm squares and transfer to a lined baking tray.
  3. Prick each square with a fork and bring all four corners together into the centre of the square. You can use the egg to help make the corners stick to the middle of each square.
  4. To make the Crumble Topping, simply rub the butter into the flour and sugars until formed fine crumbs.
  5. Divide the filling between the pastry shapes, spooning it into the centre of each. Then, use your crumble mix to layer on top of the apple filling. (I had made an awful lot of crumble topping, so they were piled pretty high!)
  6. Brush all over the danishes sides with the rest of the egg, and transfer to your pre-heated oven (200C). Bake for 20 minutes until the pastry is golden.

img_1466

These Apple Crumble Danish are incredibly moorish, we practically demolished the entire batch in a weekend. Depending on how big you cut the pastry square, depends on how many you make. My batch made about 12, but I would definitely make them slightly large next time, only by a few centimetres which would probably cut it down to about 8 or 9.

The sweetness of the crumble against the pastry casing and soft apples work really well together. Is it bad I love how pretty they look too? You can clearly see all the fine layers on the pastry once it has “puffed” up in the oven. Even with the crumble, they still feel light and airy! They are delicious on their own, and even more so when they are accompanied with a cup of coffee. How every Saturday morning should start!

img_1464

What do you think of my twist on these classic Apple Danish?

Have you tried experimenting with two of your favourites?

wpid-All_Fonts__2_of_1_747_Fonts_.jpg

Did you know you can also find me here:

Instagram & Twitter

Funfetti Cake

I can’t believe I have happily gone 25 years and not had a slice of Funfetti Cake! Luke has been telling me about this cake for years following his travels around various parts of America. I have to put my hands up and say, this was not made from scratch, and I wonder if this is the reason this cake tastes so much sweeter (quite literally!).

img_1336

I’ve never been one to make a cake from a packet. I guess I see them as such an easy thing to make; simply pop all the ingredients in a bowl and whisk!? But after our little trip to NYC, we came back with not only the cake mix but also the frosting and boy, is this cake moorish! With it’s soft vanilla sponge and added crunch of coloured sprinkles scattered throughout, this has “sweet tooth” written all over it, and that’s before the added vanilla frosting and extra sprinkles on top!

img_1397-1

I’m currently researching on how to make a homemade version of this sweet delight as the sugar shakes have already kicked in and I am in desperate need of another slice! To all my American followers, if you have a recipe please let me know! Luke told me the craving would come …

Are you a lover of the Funfetti Cake?

Do you have that perfect recipe to make this cake from scratch?

wpid-All_Fonts__2_of_1_747_Fonts_.jpg

Did you know you can also keep up with all my bakes here:
Instagram & Twitter

Mint Chocolate Chip Ice Cream

After a successful first attempt at homemade ice-cream, which can be found here, I was straight into the kitchen again working out recipes to try something new. I love Mint Chocolate Chip, and loved Jane’s (from Jane’s Patisserie) “No Churn” recipe here. With the summer months fast approaching, ice cream is going to be the top of all my desserts! I absolutely love ice cream and feel it’s definitely an appropriate dessert to be enjoyed all year round (in fact we like it so much we want our entire wedding cake made of the stuff – pure ice cream bliss!)

img_1287

I didn’t realise there were so many ways to make ice cream! Not only was this ice cream a huge experiment with flavour and texture, it was also something completely new for me with some added pressures, but totally worth the end results!

To make a batch of Mint Chocolate Chip Ice Cream which serves approximately 16-20:

Ingredients:

  • 8 egg yolks
  • 600ml whole milk
  • 230g sugar
  • 600ml whipping cream
  • 4-6 tsp peppermilk extract
  • 1 tsp vanilla extract
  • 100g chocolate chunks
  • 1/2 tsp green food colouring

Method:

  1. In a medium saucepan over a medium heat, heat the milk until it becomes very hot but not boiling. Remember to stir continuously as to not burn, then remove from the heat and set aside.
  2. In a separate bowl, place the egg yolks and sugar into a mixing bowl and whisk until well blended, approximately 30 seconds. The mixture should become slightly thickened.
  3. Slowly whisk in the warmed milk, being careful not to scramble the eggs! Once blended, return the mixture to the saucepan and heat gradually until the outer edges start to bubble. Again, stir continuously as to not scramble the eggs!
  4. Transfer the hot mixture back into the whisking bowl and slowly add the whipping cream , vanilla, peppermint extract, food colouring and salt.
  5. Chill for at least 8 hours.
  6. Assemble and engage the freezer bowl, dasher and drive assembly as per the instructions of the KitchenAid Ice Cream attachment. Turn to Speed 1 and slowly add the mixture.
  7. Continue to stir for 20 minutes until the mixture has thickened, adding the chocolate chunks in the last minute of churning.
  8. Immediately transfer into an air tight container and freeze overnight until hardened.

img_1285

It was difficult not to turn the “custard like” mixture into scrambled eggs, you definitely need to take your time with this one and make sure not to boil the mixture. But don’t be put off by the waiting game. As long as you have patience and plenty of time, it’s not too difficult to get right. If you have ever made homemade custard before, I can imagine you’d be a pro!

Again, I found that you don’t have to wait the full 8 hours for the mixture to cool, although this time is wasn’t far off, (even with our fridge being quite cold to begin with), as the mixture is warm once combined, it will take longer to chill.

The ice cream formed beautifully, although it didn’t grow up the bowl and into the mixer paddle as much as the Caramel and Pecan, but you can certainly tell the mixture thickened. The nice thing about homemade Ice Cream is that once all ingredients are circling in the frozen bowl, you can leave it happily for 20 minutes to churn.

img_1288

This ice cream once frozen overnight was incredibly smooth and creamy, although a slightly different texture to the batch before. Adding extra peppermint gave a strong taste, and the added crunch of the frozen chocolate chunks gave the traditional flavour and texture you’d expect. I think there is still  few tweaks here and there to be made like most first time recipes, but I’m excited to try new recipes over the summer, and even have a crack at some Sorbets!

Have you ever tired to make home made ice cream?

What have been your experiences and what are your favourite flavours?

wpid-All_Fonts__2_of_1_747_Fonts_.jpg

Did you know you can also find me on:
Instagram & Twitter


Baking with Steam

As you will know if you follow the blog, we have spent the last few months completely transforming our kitchen. It’s been hard graft and taken a lot of work, but we are so incredibly happy with the results. And with a new kitchen comes new applications, and my new AEG oven hasn’t disappointed. Especially when I tried baking baguettes with the oven’s steam function for the first time!

img_0976

Last year you may remember I tried having a go at making Baguettes, thanks to the easy Paul Hollywood recipe which can be found here. One thing I learnt whilst making my baguettes is that you need a really wet dough, and then extra added moisture from a steam bath at the bottom of the oven when it comes to baking them.

I was gently reminded just as I was about to pop them in for baking, that our oven had this added steam function. I believe the oven we have works on a 20% steam function, but at the moment AEG are promoting combi ovens with 100% steam! Imagine that! The oven is easy to use by simply pushing a small button on the front which brings out a water container which needs to be filled. As the oven heats, so does the build up of steam and the results are a golden crust with the prefect amount of crunch.

img_0975

Baguettes can be a bit of a faff, but they are totally worth it in the end. To me, there is nothing better then a fresh baguette straight out the oven, cut into small pieces and smothered in butter. I literally spent a lot of Saturday afternoon slowly making my way through half a baguette, I just love it! These baguettes are purposely large, but I believe the above recipe will make approximately 4-5 smaller baguettes, which are prefect for individual sandwiches.

As a note, be careful when shaping as you don’t want to punch too much air out of the dough, as you want it to be as light as possible. You really do have to handle the dough with care, but don’t let this worry you when shaping. There is nothing worse than dense, hard bread, so shaping involves a very gentle roll with the palms of the hands and slowly forming it into the traditional long sausage shape, making sure any tucking of the dough is unseen at the bottom.

img_0977

These baguettes were incredibly light, and were timed brilliantly for lunch. They also freeze really well, you can just defrost and reheat in either the oven or the microwave to get back that soft doughy centre. The bread defrosts in minutes, and makes the perfect pasta accompaniment, especially when its divided by slabs of garlic butter!

Have you tried making baguettes before?

Do you have a recipe you can share that worked really well for you?

wpid-All_Fonts__2_of_1_747_Fonts_.jpg

* Today’s post is not sponsored. This is just one keen baker wanting 5 minutes to take the floor and rave about her new oven! 

Summer Berry Pavlova 

After making some more homemade Mint Chocolate Chip Ice Cream, I found myself with 8 left over egg whites. What better way to use them, then to make this very Summer Berry Pavlova. Perfect for sharing and in keeping with the springtime months, this dessert is simple to make and even simpler to demolish!

img_1220

Ingredients, for the Meringue:

  • 4 egg whites
  • 250g caster sugar
  • 1 tsp white wine vinegar
  • 1 tsp cornflour
  • 1 tsp vanilla extract

Ingredients, for the Topping:

  • 200g of frozen mixed berry fruits
  • 3 tbsp icing sugar
  • 350ml double cream
  • berry coulis

Method:

  1. Heat oven to 130C (fan).
  2. Using a pencil, mark out the circumference of a dinner plate on a large sheet of greaseproof paper.
  3. Whisk the egg whites with a hand mixer until they form stiff peaks, then whisk in the sugar, 1 tbsp at a time, until the meringue looks glossy.
  4. Whisk in the vinegar, cornflour and vanilla.
  5. Spread the meringue inside the circle, creating a crater by making the sides a little higher than the middle.
  6. Bake for 1 hr, then turn off the heat and let the Pavlova cool completely inside the oven.
  7. When the meringue is cool, whip the cream and the icing sugar together and spread it over the meringue, filling in the little crater.
  8. Scatter the fruit over the cream and then drizzle the berry coulis over the top as decoration and extra flavour.

img_1221

The meringue for me turned out perfectly, with a soft, gooey centre and a nice crisp outer edge. Pavlova just makes me so happy. When I think of a good ol’ Pavlova, I think of summer, family, gatherings with friends and lingering afternoon BBQ’s! It’s also quick and simple to make and requires only 5 ingredients – so beautiful in it’s simplicity. So why not whip up one of these fruity delights this weekend, and impress your friends and family with this sweet dessert!

Do you love Pavlova?

What would be some of your fruity favourites?

wpid-All_Fonts__2_of_1_747_Fonts_.jpg

Did you know you can also find me on:

Instagram & Twitter

The Best of April

It feels great to be back in the swing of baking and blogging on a weekly basis. I’m trying to blog twice a week now, starting with a bake at the beginning of the week to get over the Monday blues, and ending the week with a bake for the weekend! With this new ambition to blog regularly, April has been a busy month, showcasing a range of easy, yet delicious bakes for you to try at home.

The month started with this Quick Quiche, which I think will become a favourite over the summer months. They are so quick and easy, and you can also prep the casing in advance, which makes it even easier the following day. It’s not a neat recipe, it’s a “throw it all together” type dish, but tastes great! There are so many other flavourings to experiment with, no dish will ever have to be the same!

img_1147

The month also began with some serious Holiday Blue’s, so I reverted back to memories of our time in Australia and the delicious Banana Bread we came across in many cafes, and enjoyed plenty of slices over freshly brewed coffee. Not only is Banana Bread incredibly scrummy, fluffy, moist, and infused with sweet banana flavour, it’s a perfect mid morning snack to fill that little gap of hunger and incredibly easy to make.

With Easter over, but still craving that chocolate goodness, next came these scrumptious Raspberry and White Chocolate Chunk Brownies.  This recipe really is so simple to make, and the brownies themselves are delicious. The added raspberries are a really nice touch, and add a different texture to the brownies. I just love the taste of the sweetness of the chocolate against the almost sour taste of the raspberries. And when you get a big chunk of white chocolate, what a treat! As chocolate brownies go, these now have to be one of my favourites!

Another “Throwback Thursday” post brought us these scrummy Double Chocolate Chip Cookies. Cookies which are just perfect any time of the year. I just love them, and could eat them all day, every day! The best part about cookies, is that the dough is always the same, but you can add so many different ingredients to come up with a number of different flavours.

wpid-photoeditor-1441564455484.jpg

To end the month, and with the feeling of spring, I finally had a chance to make my own homemade Caramel and Pecan Ice Cream. Making ice cream like this can take time, but is totally worth it! Don’t be put off by the waiting game. This ice cream is incredibly smooth and creamy, and I have to say it’s probably one of the nicest ice creams I have had in a long time. The flavour of the caramel is strong throughout, and the added pecans give a new dimension to flavour and texture. I’m excited to try other ice creams over the summer, I’m thinking may be Mint Chocolate Chip next!

Not only that, but I enjoyed my very first slice of Funfetti Cake! All I have to say is “wow” – I’m going to have to find out how to make this sweet delight from home, as the sugar shakes have already kicked in and I am in need of another slice! My American followers, if you have a recipe please let me know! Luke told me the craving would come …

How was your April?

Are you looking forward to the change in weather and the hope for Spring? What plans do you have for May?

wpid-All_Fonts__2_of_1_747_Fonts_.jpg

Did you know you can keep up with all my bakes here:

Instagram & Twitter

Caramel and Pecan Ice Cream

For Christmas, I was so excited to receive the KitchenAid Ice Cream attachment as seen here. I had played around with a few non-churn recipes last year and was pleased with the results. I love ice cream and feel it’s an appropriate dessert to be enjoyed all year round (in fact we like it so much we want our entire wedding cake made of the stuff – pure ice cream bliss!) Anyway, with the new kitchen now almost complete and the added larger freezer space, it was time to try this bad boy out, and I have to say, I was impressed!

img_1172

I wasn’t quite sure what to expect when I took everything out of the box. It comes with a freezer bowl which needs to be frozen at least 15 hours before making ice cream, but I would recommend popping it in the freezer the night before, as long as you have the room! Having not made ice cream before, I decided to follow one of the recipes from the manual which includes a handful of different flavours. Being an American brand, I found I needed to Google a few ingredients to work out what the English substitution was, but this was easily found and added straight to the weekly shop.

The below recipe is courtesy of the enclosed manual, with ingredients tweaked with English substitutions:

Ingredients:

  • 850ml whole milk
  • 1 can unsweetened condensed milk
  • 1 can of carnations caramel
  • 1 packet of butterscotch flavoured angel delight
  • 1 tsp vanilla essence
  • a pinch of salt
  • 100g packet of chopped pecans

Method:

  1. In a medium bowl, place all the ingredients except the pecans and whisk until well blended.
  2. Once all ingredients are combined, cover with clingfilm and chill thoroughly for at least 6 hours.
  3. Assemble and engage the freezer bowl, dash and drive as per the instructions (remember the freezer bowls needs to be pre-frozen for at least 15 hours prior to making the ice-cream) Turn to Speed 1 and slowly put the mixture into the freezer bowl.
  4. Continue on Speed 1 for 20 minutes until the ice cream has thickened. In the last minute, add the chopped pecans and continue to churn.
  5. Immediately transfer the ice cream into an airtight container and leave in the freezer over night to harden (the ice cream will be thick but still runny).

img_1173

Making ice cream like this can take time, but is totally worth it! Don’t be put off by the waiting game. I found that you don’t have to wait the full 6 hours as our fridge is quite cold to begin with, and I think overall it had between 3 and 4 hours chill time. The ice cream formed beautifully, so much so that it grew up the bowl and into the mixer paddle as it thickened. From this, it can also be a bit messy and you need to work quickly, but once all ingredients are circling the bowl, you can leave it happily for 20 minutes to churn.

This ice cream once frozen overnight was still incredibly smooth and creamy. I have to say it’s probably one of the nicest ice creams I have had in a long time. The flavour of the caramel is strong throughout, and the added pecans give a new dimension to flavour and texture. I’m excited to try other ice creams over the summer, I’m thinking may be mint chocolate chip next!

img_1174

If you are thinking of making your own ice-cream and have a KitchenAid Mixer, I would definitely recommend this attachment *

Have you ever tired to make home made ice cream?

What have been your experiences and what are your favourite flavours?

wpid-All_Fonts__2_of_1_747_Fonts_.jpg

*  Please note, this is not a sponsored or review post on the KitchenAid Ice Cream attachment, this is just a keen blogger ranting about the great Christmas present she received and the experiences that came from it. 

“Throwback Thursday” – Double Chocolate Chip Cookies

Why is there always that one recipe that just happily sits in your “drafts” for months, waiting for you to post it? Well, we are bringing back these Double Chocolate Cookies in this weeks “Throwback Thursday” post!

Cookies are just perfect any time of the year. I just love them, and could eat them all day, every day! The best part about cookies, is that the dough is always the same, but you can add so many different ingredients to come up with a number of different flavours. I had already experimented last year with the Chocolate Stuffed Cookies, as well as these Peanut Butter and M&M Cookies. All equally delicious, and all follow the same recipe, but each comes with a few added tweaks here and there to come come up with something different every time!

image

These Double Chocolate Cookies are super rich and packed with big chunks of white chocolate. Pop in the oven for approximately 10 minutes and out pop these ultra soft cookies, with a nice outer edge crunch. Mmm .. my favourite.! They are simple to make, and all you need are:

Ingredients:

  • 110g butter
  • 100g lightly packed brown sugar
  • 100g white sugar
  • 1/2 tsp vanilla essence
  • 1 egg
  • 200g self raising flour
  • 50g strong cocoa powder
  • chocolate chunks to taste, I went with a mixture of white and milk chocolate

Method:

  1. Beat together the sugars, butter and vanilla essence until well combined.
  2. Add the egg and beat again – it may curdle to start with, but not to worry, just beat a little linger and it will start to come back together.
  3. Add the flour and cocoa powder and mix together until a soft dough is made. Finish by adding the chocolate chunks and mix until evenly combined throughout the dough.
  4. Remove the dough from the bowl and roll out into a long sausage shape onto a lightly floured work surface. Divide the mixture into approximately 16 pieces, depending on the size of the cookie (remember they expand in the oven!).
  5. Bring each piece of dough together into a ball and pop onto a tray covered in greaseproof paper.
  6. Bake in the oven at 180C for around 10-12 minutes. They should start to crack on top when they are cooked, but if you prefer an extra crunch to your cookie, you may wish to bake for a further few minutes.


image

Once you have removed from the oven, allow to firm up for a minute or two, before cooling on a wire rack. Now, storing these bad boys shouldn’t be a problem, a small tin will do! Although if your like me, they may not even last long enough to make it to a tin!

Are you like me and love cookies?

What are you favourite flavour combinations?

wpid-All_Fonts__2_of_1_747_Fonts_.jpg

Did you know you can also find me on:

Instagram & Twitter

Raspberry and White Chocolate Chunk Brownies

Last year I experimented with these Raspberry and Chocolate Brownies, and after all the Easter bakes and these Easter Chocolate Brownies, I had a real craving for another slice! Incorporating both recipes, I think I have finally found the right balance and with the added cooking time, these brownies are still perfectly moist, and extremely delicious!

img_1144

Ingredients:

  • 200g 70% Dark chocolate
  • 100g Milk chocolate
  • 250g Salted butter (if you only have unsalted, just add a pinch of salt)
  • 300g Soft light brown sugar
  • 4 Large eggs
  • 175g Plain flour
  • 100g white chocolate, chopped
  • 1 punnet of fresh raspberries

Method:

  • Pre-heat the oven to 180C.
  • Line your tin with baking paper.
  • Melt the chocolates, butter and sugar together over a low heat.
  • Once they are melted, remove from the heat and leave to cool for 5 or 10 minutes.
  • Beat in each egg, one by one and once combined, stir in the flour.
  • Place half of the batter into the bottom of your tin. Spread half the punnet of raspberries over this batter evenly.
  • Pour the other half of the batter over the raspberries and smooth out with a spatula.
  • Decorate with the remaining raspberries and bake for about 30-40 minutes depending on the thickness of your brownies and the tin size that you have chosen to use. As a quick tip, the skewer should come out only just clean!

img_1146img_1145

This recipe really is so simple to make, and the brownies themselves are delicious. The added raspberries are a really nice touch, and add a different texture to the brownies. I just love the taste of the sweetness of the chocolate against the almost sour taste of the raspberries. And when you get a big chunk of white chocolate, what a treat! As chocolate brownies go, these now have to be one of my favourites!

These were demolished pretty quickly over the weekend, and enjoyed thoroughly in the sunshine after a few hours pottering around the garden! The nice thing about these brownies is that they really are so simple to make, and you can be eating them with a cup of coffee within the hour!

img_1143

How was your weekend?

Did you bake anything scrumptious?

wpid-All_Fonts__2_of_1_747_Fonts_.jpg

Banana Bread

When we went to Australia back in September, I found I ate so much Banana Bread – why? – I’m not entirely sure, it’s not something I have ever had the urge to eat a lot of in the UK! But after having serious Holiday Blues, I decided it was time to try making some for myself, and I certainly wasn’t disappointed! Not only is Banana Bread incredibly scrummy, fluffy, moist, and infused with sweet banana flavour, it’s a perfect mid morning snack to fill that little gap of hunger. My finance likes it so much, he’s even renamed it the “Golden Bread” – says it’s all really don’t you think?

img_0927

With it being such an easy recipe to make, you can’t help but make it early on a Saturday morning in preparation for the weekend ahead. The hardest part is waiting an hour for it to bake as the whole house fills with the sweet smell of baked bananas!

Ingredients:

  • 285g plain flour
  • 1 tsp bicarbonate of soda
  • ½ tsp salt
  • 110g butter, plus extra for greasing
  • 225g caster sugar
  • 2 free-range eggs
  • 4 ripe bananas, mashed
  • 85ml buttermilk
  • 1 tsp vanilla extract

Method:

  1. Preheat the oven to 180C.
  2. Sift the flour, bicarbonate of soda and salt into a large mixing bowl.
  3. In a separate bowl, cream the butter and sugar together until light and fluffy. I find my KitchenAid does a marvellous job at whacking these together in minutes!
  4. Add the eggs, mashed bananas, buttermilk and vanilla extract to the butter and sugar mixture and mix well. Finish by folding in the flour mixture.
  5. Grease a 20cm x 12.5cm/8in x 5in loaf tin and pour the mixture into the tin.
  6. Transfer to the oven and bake for about an hour, or until well-risen and golden-brown.
  7. Remove from the oven and cool in the tin for a few minutes, then turn out onto a wire rack to cool completely before serving.

It may not look the neatest, or the prettiest, but sometimes these things don’t seem to matter – taste conquers all! The brown sugar and ripe bananas make this bread so incredibly moist. Remember with Banana Bread, you want your banana’s mostly brown and practically rotten. Trust me, the bin is not an option for these banana’s – the oven is!

I am in desperate need to make more, because let’s be honest, there is nothing better then a thick slice with a home brewed cup of coffee! Now this is what weekends are made for …

img_0928

What do you think of Banana Bread? Are you a fan?

It’s almost Friday, so happy weekend lovelies!

wpid-All_Fonts__2_of_1_747_Fonts_.jpg